
You can create and apply custom certificates that are emailed to a student upon completion of a curriculum or course. You define the placement of each field on the certificate with a text-based .ini file and upload your own certificate PDF.
Before you begin
- Email functionality must be enabled at the admin level, and users must have email addresses in their user profiles. For additional information on the email SMTP property settings, see System properties reference.
- The Course is completed notification at the course level or curriculum level must be active for students to receive the notification with the attached certificate in
.pdfform. See Managing course and session notifications. - Certificates can appear in a decorative form or a transcript form. Different sizes and shapes of certificates can be included within the course work. Certificates are limited to printing on one side of a single sheet of paper.
Define custom certificate settings
Create a text-based .ini file containing the name/value pairs that override the default settings for the certificate system properties described below. Save the .ini file with the same name as the certificate .pdf file and place both files in a directory named \customcert\course in your CourseMill working directory. For example, if you create a custom certificate for a course ID of Kites101, the files would be named customcert\course\Kites101.pdf and customcert\course\Kites101.ini.
For each property, adjust the values to determine the proper placement on the certificate page. In general, each field has three settings:
- A font size
- An X coordinate
- A Y coordinate
A value of -1 means you are not printing that field on the certificate.
Certificate properties
All X and Y position data is formatted as centered and justified.
- CompCertAddressSize – Specifies the size of the student's address on the course completion certificate. Default: 14.
- CompCertAddressX / CompCertAdressY – Specifies the X and Y coordinates of the student's address location on the course completion certificate. Default: -1.0/-1.0.
- CompCertAlign – Specifies what type of alignment on the page the certificate should be (Left, Center, Right). Default: Center.
- CompCertCitySize – Specifies the size of the student's city on the course completion certificate. Default: 14.
- CompCertCityX / CompCertCityY – Specifies the X and Y coordinates of the student's city location on the course completion certificate. Default: -1.0/-1.0.
- CompCertStateSize – Specifies the size of the student's State on the course completion certificate. Default: 14.
- CompCertStateX / CompCertStateY – Specifies the X and Y coordinates of the student's State location on the course completion certificate. Default: -1.0/-1.0.
- CompCertZipSize – Specifies the size of the student's Zip on the course completion certificate. Default: 14.
- CompCertZipX / CompCertZipY – Specifies the X and Y coordinates of the student's Zip location on the course completion certificate. Default: -1.0/-1.0.
- CompCertCityStateZipSize – Specifies the size of the student's city/state/zip on the course completion certificate. Default: 14.
- CompCertCityStateZipX / CompCertCityStateZipY – Specifies the X and Y coordinates of the student's city/state/zip location on the course completion certificate. Default: -1.0/-1.0.
- CompCertCompletionDateSize – Specifies the size of the course CompletionDate on the course completion certificate. Default: 14.
- CompCertCompletionDateX / CompCertCompletionDateY – Specifies the X and Y coordinates of the course CompletionDate location on the course completion certificate. Default: -1.0/-1.0.
- CompCertCourseNameSize – Specifies the size of the course name on the course completion certificate. Default: 24.
- CompCertCourseNameX / CompCertCourseNameY – Specifies the X and Y coordinates of the course name location on the course completion certificate. Default: 347.0/396.0.
- CompCertCreditHoursSize – Specifies the font size of the number representing the credit hours earned for the course on the course completion certificate. Default: 14.
- CompCertCreditHoursX / CompCertCreditHoursY – Specifies the X and Y coordinates for the location of the number of credit hours earned on the course completion certificate. Default: -1.0/-1.0.
- CompCertDaySize – Specifies the font size of the day of the month location on the course completion certificate. Default: 14.
- CompCertDayX / CompCertDayY – Specifies the X and Y coordinates of the day of the month location on the course completion certificate. Default: 400.0/398.0.
- CompCertInstructorNameSize – Specifies the size of the instructor name location on the course completion certificate. Default: 14.
- CompCertInstructorNameX / CompCertInstructorNameY – Specifies the X and Y coordinates of the instructor name location on the course completion certificate. Default: 463.0/549.0.
- CompCertMonthYearSize – Specifies the size of the month and year location on the course completion certificate. Default: 14.
- CompCertMonthYearX / CompCertMonthYearY – Specifies the X and Y coordinates of the month and year location on the course completion certificate. Default: 400.0/565.0.
- CompCertRotation – Specifies the rotation in degrees of the text written to the certificate. The default is 90 for a regular certificate that prints in portrait mode but is really landscape. Default: 90.
- CompCertScoreSize – Specifies the font size of the score received in the course on the course completion certificate. Default: 14.
- CompCertScoreX / CompCertScoreY – Specifies the X and Y coordinates of the score location on the course completion certificate. Default: -1.0/-1.0.
- CompCertSessionNameX / CompCertSessionNameY / CompCertSessionNameSize – Specifies the X and Y coordinates and the font size of the session name on the course completion certificate. Default: -1.0/-1.0 (coordinates) and 14 (size).
- CompCertSessionStartX / CompCertSessionStartY / CompCertSessionStartSize – Specifies the X and Y coordinates and the font size of the session start on the course completion certificate. Default: -1.0/-1.0 (coordinates) and 14 (size).
- CompCertSessionEndX / CompCertSessionEndY / CompCertSessionEndSize – Specifies the X and Y coordinates and the font size of the session end on the course completion certificate. Default: -1.0/-1.0 (coordinates) and 14 (size).
- CompCertStudentNameSize – Specifies the size of the student name location on the course completion certificate. Default: 24.
- CompCertStudentNameX / CompCertStudentNameY – Specifies the X and Y coordinates of the student name location on the course completion certificate. Default: 220.0/396.0.
- CompSubOrgNSize (N = 0 through 15, for example CompSubOrg0Size, CompSubOrg1Size, and so on) – Specifies the size of the Sub-Org N location on the course completion certificate. Default: 14 for each.
- CompSubOrgNX / CompSubOrgNY (N = 0 through 15) – Specifies the X and Y coordinates of the Sub-Org N location on the course completion certificate. Default: -1.0/-1.0 for each.
Certificate files
CourseMill's default certificate (CompCert.pdf) is used when a course or curriculum is completed and the corresponding Course is Completed notification or the Curriculum is Completed notification is turned on. The coordinates for this default certificate are already set in the CourseMill properties.
To use a different default certificate, load the .pdf file into your system (named CompCert.pdf) and change the managed properties to fit it. Make sure your landscape certificate is rotated 90° counter-clockwise and saved as a portrait .pdf. You can do this in Adobe Photoshop or Illustrator by rotating the canvas and saving. If you do not have either program, free online applications can rotate a .pdf file and save it.
Note: CourseMill's default certificate was created in portrait mode but it was designed as a landscape certificate. When viewing this default certificate for a completed course, it looks like this:

This is important to know because if you are using your own certificate and have saved it out in landscape mode, the functionality of wrapping text where it does not fit on a line will not work properly. For example, if a course name is too long to fit on one line and you want it to wrap to the next line, the landscape certificate must lastly be rotated 90° counter-clockwise and saved out in portrait mode for this to work properly.
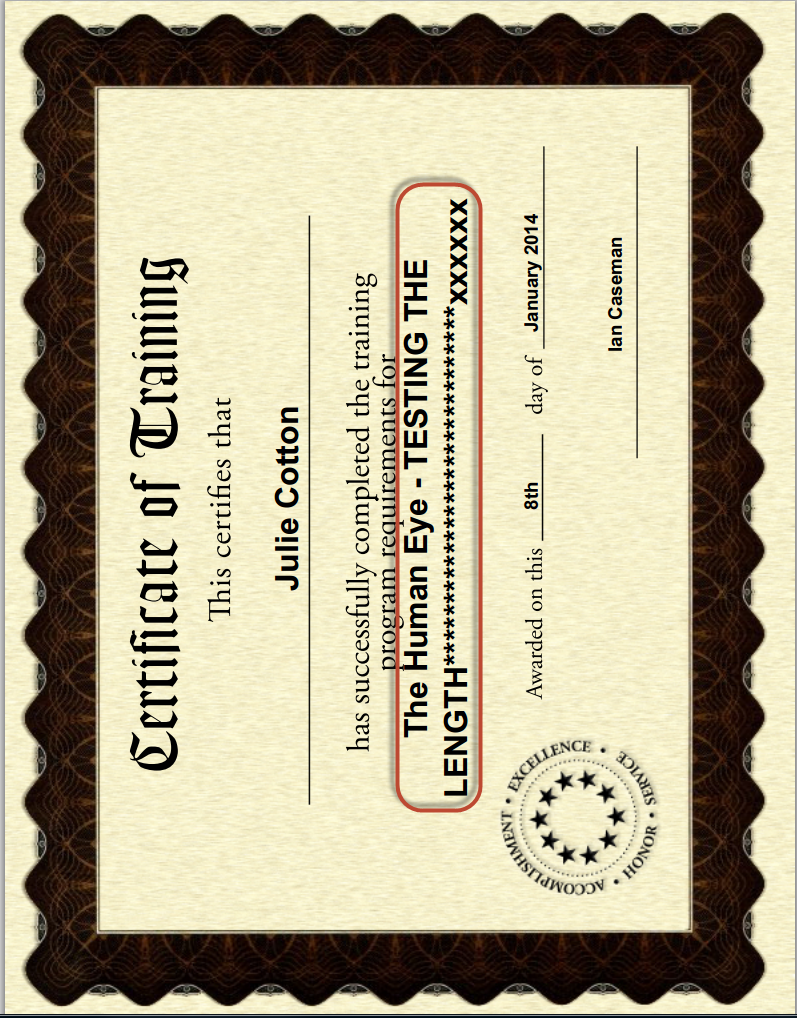
Otherwise, if the landscape certificate is created in landscape mode, text that does not fit on one line does not wrap onto the next line but wraps on top of itself, as shown in the course name of this example:

Understand that this is only an issue if you have lengthy text on a certificate created as landscape and in landscape mode.
How CourseMill finds certificates
When the Course is completed notification is activated and the completion email is sent, CourseMill locates the appropriate certificate in this order:
- It checks the Curriculum folder for a match on a certificate.
- If not found, it checks the Course folder for a match on ID.
- If not found, it defaults to the standard certificate.
Create a custom certificate for a specific course or curriculum
To use a certificate for a specific course or curriculum rather than the default certificate:
- Navigate to Manage Course or Manage Curriculum and select the course or curriculum you want to upload the certificate to.
- Click the Upload Certificate button.
- Create an
.inifile that specifically describes the coordinates for each field you want printed on the certificate.
Find the coordinates
Import the certificate file into an artwork program that displays the coordinates of the course. Mark down the coordinates for each field you want printed.
Set up the .ini file
The .ini file is a text file named CourseID.ini or CurrID.ini. The example below contains all possible fields available to print on a certificate. The easiest way to create your .ini file is to copy all the fields below, paste them into Notepad, edit your values, and save the file as an .ini file. A value of -1 means that field is not printed anywhere on the certificate.
Example .ini file contents:
CompCertAddressSize=14
CompCertAddressX=-1
CompCertAddressY=-1
CompCertAlign=Center
CompCertCitySize=14
CompCertCityStateZipSize=14
CompCertCityStateZipX=-1
CompCertCityStateZipY=-1
CompCertCityX=-1
CompCertCityY=-1
CompCertCompletionDateSize=14
CompCertCompletionDateX=395
CompCertCompletionDateY=130
CompCertCourseNameSize=24
CompCertCourseNameX=-1
CompCertCourseNameY=-1
CompCertCreditHoursSize=14
CompCertCreditHoursX=-1
CompCertCreditHoursY=-1
CompCertDaySize=14
CompCertDayX=-1
CompCertDayY=-1
CompCertInstructorNameSize=14
CompCertInstructorNameX=-1
CompCertInstructorNameY=-1
CompCertMonthYearSize=14
CompCertMonthYearX=-1
CompCertMonthYearY=-1
CompCertRotation=0
CompCertScoreSize=14
CompCertScoreX=-1
CompCertScoreY=-1
CompCertSessionEndSize=14
CompCertSessionEndX=-1
CompCertSessionEndY=-1
CompCertSessionNameSize=14
CompCertSessionNameX=-1
CompCertSessionNameY=-1
CompCertSessionStartSize=14
CompCertSessionStartX=-1
CompCertSessionStartY=-1
CompCertStateSize=14
CompCertStateX=-1
CompCertStateY=-1
CompCertStudentNameSize=32
CompCertStudentNameX=400
CompCertStudentNameY=350
CompCertSubOrg0Size=14
CompCertSubOrg0X=-1
CompCertSubOrg0Y=-1
CompCertSubOrg10Size=14
CompCertSubOrg10X=-1
CompCertSubOrg10Y=-1
CompCertSubOrg11Size=14
CompCertSubOrg11X=-1
CompCertSubOrg11Y=-1
CompCertSubOrg12Size=14
CompCertSubOrg12X=-1
CompCertSubOrg12Y=-1
CompCertSubOrg13Size=14
CompCertSubOrg13X=-1
CompCertSubOrg13Y=-1
CompCertSubOrg14Size=14
CompCertSubOrg14X=-1
CompCertSubOrg14Y=-1
CompCertSubOrg15Size=14
CompCertSubOrg15X=-1
CompCertSubOrg15Y=-1
CompCertSubOrg1Size=14
CompCertSubOrg1X=-1
CompCertSubOrg1Y=-1
CompCertSubOrg2Size=14
CompCertSubOrg2X=-1
CompCertSubOrg2Y=-1
CompCertSubOrg3Size=14
CompCertSubOrg3X=-1
CompCertSubOrg3Y=-1
CompCertSubOrg4Size=14
CompCertSubOrg4X=-1
CompCertSubOrg4Y=-1
CompCertSubOrg5Size=14
CompCertSubOrg5X=-1
CompCertSubOrg5Y=-1
CompCertSubOrg6Size=14
CompCertSubOrg6X=-1
CompCertSubOrg6Y=-1
CompCertSubOrg7Size=14
CompCertSubOrg7X=-1
CompCertSubOrg7Y=-1
CompCertSubOrg8Size=14
CompCertSubOrg8X=-1
CompCertSubOrg8Y=-1
CompCertSubOrg9Size=14
CompCertSubOrg9X=-1
CompCertSubOrg9Y=-1
CompCertZipSize=14
CompCertZipX=-1
CompCertZipY=-1
Display certificates
Administrators or instructors/reporters can access certificates using the Transcript button in Manage Users:
- Once the transcript is displayed and a certificate is in force for the user, a Certificate button appears at the bottom of the Transcript dialog.
- To the right of each course is a column for certificates. If a certificate exists, a PDF launch button is displayed that you can click.
- Selecting an individual certificate lets you view, save, and print it.
Note: If the certificate does not display, your browser may be blocking a pop-up. Allow the pop-up and try viewing again.
Students can access certificates using the Transcript tab on the My Course page:
- Select the Transcript tab.
- To the right of each course is a column for certificates. If a certificate exists, the student can click a PDF launch button.
- Select an individual certificate to view and print.