Shopify Rockstar Learning Platform Integration
The Shopify integration is used for eCommerce purposes only. If you would like to sell your courses on Shopify and automate the user creation process after purchase, follow the steps outlined below.
1. Access the admin area on your the Rockstar Learning Platform platform.
2. Navigate to the settings tab and then click on the integration tab on the left hand side of the page.
3. Click the Integrate with Shopify button and enter your Shopify URL
4. You will be brought to a new page where you will have to click the install app button.
5. After you have installed the app you will be brought back to the integration page in your the Rockstar Learning Platform platform. You will need to match your Shopify products to your Learner groups in the Rockstar Learning Platform. Make sure to hit the save button at the bottom of the page when you are done.
6. There will be a URL at the top of the Rockstar Learning Platform integrations Shopify page that you will need to add into your Shopify course purchase confirmation email. Login to your Shopify admin page. Click on settings, then notifications, then order confirmation. You will be brought to a page where you can edit the content in the confirmation email.
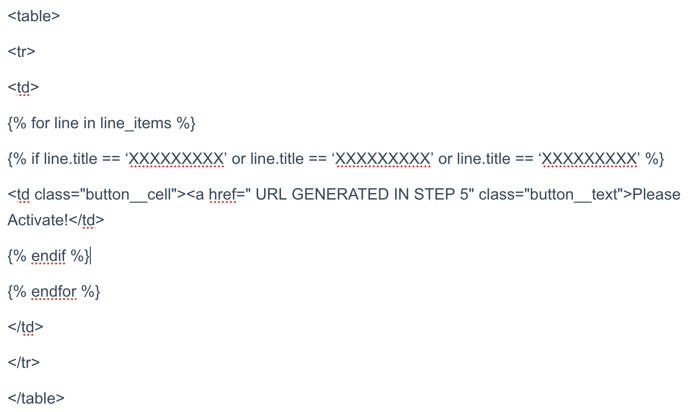
7. If you sell products that are separate from the the Rockstar Learning Platform platform, you will need to use an if statement to make the registration link appear for specific products. You will have to incorporate this piece of code into your email.
If you don’t have additional products that are not sold on the Rockstar Learning Platform, you will just need to add the link generated in step 5 to your confirmation email.

8. Please keep in mind that the line.title elements are the names of your products. This is case sensitive so the titles need to appear exactly as they do on the products page, including capital letters. You will need to add all of the Rockstar Learning Platform products to this if statement by repeating or line.title == “XXXX”
Here are some additional Shopify support articles that provide more information on if statements.
