- ELB Learning Knowledge Base
- Lectora®
- Trouble Shooting
-
Lectora®
- Quick Win Tutorials
- Getting Started
- Modular Development (ModDev)
- Quick Guides
- Best Practices
- Navigating the Workplace
- Building a Title
- Importing Content
- Working With Text
- Working with Images
- Working With Objects
- Actions and Variables
- Tests, Surveys, and Questions
- Working with Web Windows or HTML Extensions
- Publishing a Title
- Creating Web-based, Accessible Content (Section 508/WCAG)
- Lectora Layouts
- Managing Titles
- Managing your Assignments
- Managing Your Notifications
- Communicating
- Admin Guide
- Lectora Player Skins
- Lectora Interactions and Scenarios
- Games
- Misc.
- Programming
- General
- Using Tracking for Progress, Status, etc
- Working with BranchTrack
- Trouble Shooting
- Working with Audio and Video
-
CenarioVR®
-
The Training Arcade®
- Arcades™
- Video Overviews
- FAQ's
- Recent Feature Videos
- Game Analytics
- Customer Feedback
- Demo Information
- General Admin
- Building Your Game
- Analytics
- Compatibility and Integrations
- Data, Security, and Privacy Policy
- JEOPARDY!®
- Jump
- Scenarios
- Trivia
- Trivia Virtual Instructor-Led Mode (VILT)
- Sort-It
- Scramble
- Recall
- Match
- Detective
- Translations
- New User Information
- Custom Branding Opportunities
- Registration and Leaderboard
- JEOPARDY!® Virtual Instructor-Led Mode (VILT)
-
MicroBuilder™
-
Asset Libraries
-
Rockstar Learning Platform
-
Rehearsal
-
Off-the-Shelf Training
-
ReviewLink®
-
The Learning Creation Studio
-
CourseMill®
-
General Topics
-
xAPI
-
Template Styles
-
Misc.
-
Articulate Storyline
-
Customizable Courseware
-
Course Starters
-
Camtasia
-
Group Administration
-
General
-
Can't find the answer? Ask our Customer Solutions team.
Workday LMS and Lectora AICC Published content
How to resolve when description files need to be located in the root folder.
09/16/2022
Applies to: Lectora prior to version 21.4 and Lectora Online
The steps to build this content are fairly simple.
- Publish to AICC as usual, but on the Publish Dialog, HTML Options tab, uncheck 'Create a zip file' option.
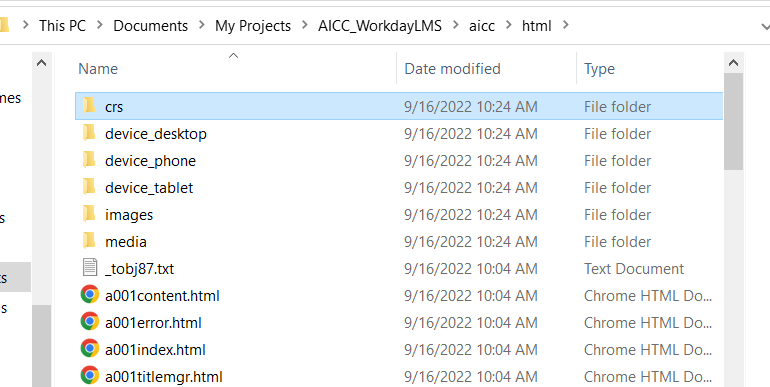
- Continue publishing, then go to the published folder (can click Browse on the Done publishing screen). This will put you in the published folder, typically C:\Users\YourName\Documents\My Projects\ProjectName\aicc\html Image below.
- Open the subfolder \crs
- Copy the 4 files found here to the \html folder above. Do not move, use copy.
- In the \HTML folder, open the .au file in a text editor
- Locate the following reference that begins with '..\', usually on line 2 of the file. "..\a001index.html". This needs to be edited to remove the '..\' preceding the filename. The ..\ tells the software to look for the file in the folder above the current folder, which will cause a failure now that the file exists in the 'above' folder (\html). Image below.
- Last, create a .zip file to deliver to the LMS. Select all files in the folder, click the right mouse button, and select Send to Compressed file. Note the .zip file will be located in the \html folder.